Monday, August 15, 2011

Memory Wire... added with Paper Beads


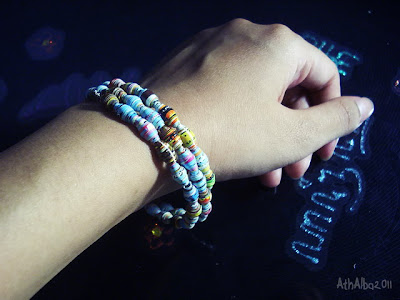
After months of being neglected, my paper beads have finally come to use. It looks cheesy tho and I still can't really remember whether or not I have varnished it. But oh well, at least now I have one new bracelet. :)

Thursday, August 11, 2011

Memory Wire... What the heck is it?!


I've posted this in my tumblr but it's in Bahasa Indonesia and I wanted to give it a go in English.

So, in searching for a cool jewelry inspiration, I stumbled upon two words, "memory wire". I had no idea what a memory wire is. Could it remember something? Or was it like electricity cable? I was seriously clueless.

After doing a serious googling, I founded out that memory wire is a type of wire that could retain its shape. Then it came to my mind a certain bracelet with blue cat's eye beads that I had years ago which use this particular wire. I also see such bracelets at accessories shops and even had the liberty to explain to my sister about this particular wire.

What I didn't know was that I had actually bought a pack of memory wire without knowing it. I thought it was just normal wire (again, normal here means not too thick, nor too thin). It looks thin and easy to bend but when I actually tried to bend it, oh boy... you don't want to know.

That's when I realized that I actually had memory wire all this time. The one that I have reminds me of slinky. I wouldn't play it like one tho, because it easily gets tangled. And believe me, when it's tangled, it is difficult to sort it out. Trust me, I've tried to untangle it from the start of National Treasure 2 until the end - which includes the credit rolls - and it is still tangled. Boo.

Fooling around with the memory wire. :D
Made it Myself Jump Rings.


These jump rings are the result of my cheapness and curiosity

I was bored using my usual copper coloured jump rings so I decided to make my very own silvery jump rings. At first I tried with my normal wire (normal being that it's not too big, neither it's too small) but in the end I couldn't manage to cut it off. Gawd, I nearly bruised my fingers and busted my wire cutter!

Eventually I used a smaller wire size, 0.5 to be exact. I was rather afraid if it would easily bend but after making a string of jump rings, it was quite inflexible. Therefore I decided to make a bunch of it while watching "The Count of Monte Cristo" - which is a good film, btw.

I might make smaller jump rings with coloured wire someday later in the future.

Things needed:
1. Wire
2. Something cylindric - I used a 3.0mm screw driver.
3. Wire cutter - one that is strong enough to cut the wire.
4. Patience - yes, this is definitely required!

Monday, August 1, 2011

Chunky Grunge Bracelets


When I was browsing for diy toggle clasp, I found this interesting page about cool jump ring trick. Considering that I had heaps of jump rings, I thought why not give it a try? And it was also a perfect project to remake one of my bracelets.


This purple one is the first that I made. I used purple stones. I think it's amethyst but I can't be really sure. It's a trial and succeed project. Hehe.


Now this red and yellow one is my bracelet before the remake. My auntie gave it to me last year and I only wore it once to a wedding. That's the problem with this bracelet. It's too flashy that I can only use it occasionally. Not to mention that it's rather too big for me and the elastic string gave me the impression that it could snap any time. I only used the red crystals for this project.


This is the bracelet after the remake. It looks more gloomy but that's the way I like it. It can fit for both casual and special occasions which make it more to my liking.


This is how they look on my wrist. Not bad eh?


This last one was a request from my sister. I used pink beads and green seed beads.


Those are all that I made but I am definitely attempted to make more. :D