Saturday, November 27, 2010

I *HEART* ART Ring


I found this ring at teenage accessories shop. I love how it says and I also love that it fits my middle finger! Normally the rings that I like are way too big. So, I bought it without hesitating. And it only cost IDR 3k.

*happy* *happy* *happy*

Tuesday, November 23, 2010

Colourful Flower


I made this for my cousin's daughter. It's actually attached on a hair clip/barrette but I forgot to take a pic for the final result.

It is made based on the instructions that I got from my clay box. It's very easy, no kidding.

Here's the how-to (based on Amos Air Dry Clay instructions):
1. Flatten an orange ball of clay for the face.
2. Make various colourful water drop of clay for petals.
3. Put the eyes, cheeks, and mouth on the face.

It's radiating cuteness! Should take a photo of my niece when she's wearing it. ^^


Unfinished look. It looks like a weird bow.

Sunflower Brooch (for a friend)


This brooch was inspired by my friend (@achiikechill) who said that a clay sunflower necklace must look cute. I actually showed her pictures of my previous work, colourful flower hair clip, and she suggested this.

I changed it into brooch because I intended to give it to her and she wears brooch more than necklace. Glad to know that she likes it and she wore it straightaway. :)


The envelope "wrapper"


The brooch and its "wrapper"

Atarashii Swan Brooch


I found this cute swan brooch at Al Fath, Citra Land moll, Semarang. It only cost IDR 2500 which means around a quarter US$ (this is if 1US$ = IDR 10000). I just had to buy it. I didn't plan to buy it but then I realized that I am sadly lacking elegant brooches. Cheesy pins are out of the options when I want to look classy.

There are so many cute yet elegant brooches there which ranges from IDR 2500 till IDR 20k-something. I liked the eagle shaped one but I couldn't be bothered to buy it. I'll just stick to what I have now.

ps: This is not promotion post. I'm not payed to promote anything.

Saturday, November 20, 2010

Creativity: Reason #1


Moral of the Story:
Creativity comes when you are penniless. :p

taken from Kobo Chan volume 44 page 87 by Masashi Ueda
translated by AthAlba

Friday, November 19, 2010

Sushi Roll Earring Studs


This is my new handmade sushi earring studs. I made it to go with my Oishii Sushi Plate necklace.

What You Need:
Clay in white, green, black, orange, and brown (I use Amos air dry clay)
Earring studs
Super glue
Clean hands (no kidding!)
Patience (yep!)


How to (sorry, no pics):
1. First, make sure you have clean hands and clean surface to work on. You would not want your clay to pick up dust and dirt - especially when you're working with white clay. They are very sensitive.

2. Make a sufficient ball - sufficient enough to decorate your earlobe - out of white clay. Then flatten it. You will have a round white clay. If it's not round enough for your taste, shape the sides with your fingers. When your already satisfied with the shape, prick one side of the clay with a needle. This will be the "rice" side.

3. When you've got Step 2 done, proceed with covering it with "nori". Mix green and black clay so that you get dark green. After that, roll it until it turns into a nice thin stick. Then flatten it. The width should be as wide as the "rice" height. When you've got the measurement right, then cover the side of the "rice" with this dark green "nori".

4. Next step is to make the filling. Roll three tiny balls of green, orange and brown clay. Put this on the side which you have pricked with needles. Then press them lightly to make them rather flat.

5. You finally have one sushi roll. Proceed with another one. We all know that we have two ears, ne?

6. When you finally have two equal sushi rolls, wait until they are dry. Air dry clay's dryness depends on how thick the project is. But to be safe, wait until one night. This type of clay will turn into a rubbery, foam-like texture.

7. Once when they are completely dry, glue earring studs on them respectively.

8. Ta-da! You have your own handmade sushi earring studs.

9. Wear them with pride!


ps: This post is instructions for air dry clay. For clays like polymer or fimo, I think the instructions might be slightly different.


*UPDATE*


This is how it looks on my right ear. It's perfect enough for my taste. ^^

Friday, November 12, 2010

Blue Bottle Up Close


Just a random photo that I took with my Jenoptik 8mp pocket camera earlier this year. I enhanced it a little bit by using photoscape.

Wednesday, November 10, 2010

Steaming in Steampunk


I got into a very drawing mood yesterday and this came up as a result.

This is supposed to be me in my steampunk attire. The shoes are what I like best. :)

Sadly, I think this is my only way to be able to be seen in something steampunk 'cuz it would actually look weird if I support steampunk fashion where I live right now.

And to be honest, I'm not actually a fan of steampunk fiction. It's actually weird 'cuz these steampunk fashion came from the fiction itself. Jules Verne is an example of one of the prominent authors in this genre.

Next time I'll try another different fashion, maybe something that I also like. Feel free, I'm open for suggestions (as long as it's not something raunchy). :)

Tuesday, November 9, 2010

Yeah, I'm a Gunner Lady!


This was made in 2005, exact date was from the first of April till the 15th, for arts project.

Mr Art's Teacher asked us to make a caricature and what else could be better than me wearing the Ladies 2004-2005 jersey?!

It was also inspired by something that Dido (yes, the singer) said about wanting to be the first lady to play for Arsenal.

It looked good at that time but it looks kinda funny now. My boobies are not that perfect. Haha.

Sunday, November 7, 2010

Let's Make Paper Beads :)

Have you ever wonder what to do with paper wrappers that are too cute to throw away? Well, wonder no more! With things you can find on hand, plus extra time, you can turn these paper wrappers into pretty paper beads. Wanna know how? Follow me right now!

Hehe, how was my promotional writing? Did you buy it? I hope you do, because paper beading is fun! I think many people already know this technique, but I feel that it's no harm to post the how-to here. I first learned this technique when I was the fourth grade. At that time I used calender paper. It was pretty plain and I didn't do it neatly so the result wasn't that good.

Well, enough babbling and let's make paper beads!

What you need:
Pretty paper wrappers (or any kind of paper, it's recycling at the best)
Scissor/razor
Ruler (optional)
Pencil/pen (optional)
1 Toothpick
glue

Clear nail varnish (optional)

Steps:

1. Measure your beads

I used these triangles to make the beads. The longer it is, the bulgier in the middle it will be. The wider the base is, the longer the bead will be. I prefer the base to be around 1-1.5cm, while the length around 22cm.
Triangles are just optional. You can make a rectangle and roll it up (it will turn into a cylinder, tho).
Cutting a lot of these in advance saves time.


This is what it looks like after it is being cut (wide: 1cm, length: 22cm)

2. Roll It


Put the base of your triangle on a toothpick and start to roll it. I prefer to put a little bit of glue every other time to maintain its shape.


Roll it tightly, glue the end, and here is what you get!


3. Repeat Step 2


And you get pretty paper beads. Turn your paper beads into necklace, bracelets, earrings, door curtain, etc. Be creative!

I normally add two coats of nail varnish after I've done making the beads. It gives extra protection and also extra gloss. Unfortunately, I haven't got nail varnish right now. But when I've varnished it, I'll put an update.

Happy Crafting! ^^

Wednesday, November 3, 2010

Plastic Bottle to Earring Holder


What You Need:
Plastic Bottle (I used Pocari Sweat 300l - better without any or minimum lines/grids)
Cutter/scissor (I used both)
Ribbon
Glue
Paint (I used nail polish)
Marker pen(s)


I've always been wondering how to store my dangly earrings without them getting tangled or so. There are many good ones using canvas or those wire nets. Unfortunately it takes a lot of space since I can't hang it on my wall.

I found a quite efficient one on the internet using plastic bottle. The original instructions was to poke holes into the plastic. I chose to cut it because I have some dangly earrings which have clasp on the back, therefore holes cannot fit in.

I decorated it with ribbons and painted it with markers and nail polish. You've gotta use what you have, so nail polish it is. You could also decoupage it or cover it with whatever to your heart's content. Feel free to be creative.

All in all, this project is fun and free! Yay!


Pleated Headband


What you need:
One long string/rope/cable, whatever you like (as long as it's safe)
elastic band (length - adjust to your head)
needle
thread


I learned the technique from a site in the internet. I'll show you the way it is made, but please bear in mind that the pictures are NOT mine. I'd credit the owner of the photo if I knew who.

Since I had pixie haircut, I cannot separate myself from headbands. These pleated ones are easy peasy ones made out of just one single string/rope/cable, etc.


The maroon one was used using the string left from a previous project, Sakura drawstring bag. The gold one is made from an old mouse cable. It's a good recycling project, isn't it?

So, after I complete the steps above, I sew the plait on an elastic band. I normally like gluing things, but in this case, sewing makes it stronger.

This is me wearing the cable headband. My hair was still long. :)

Saturday, October 23, 2010

Crafting Reasons

Some Reasons Why People (scratch that), why I Craft:

  1. I have no money to buy the real thing,
  2. I want to show my creative side,
  3. What I want is not available or not to my liking,
  4. I want to recycle scraps and rubbish,
  5. I have no time to go and buy the thing,
  6. I have too much time in hand, and
  7. I have school task(s).
Sounds kinda lame, vain and totally unimportant, but these are true.

Sakura Drawstring Bag


I decided to make this dress a week before my graduation day. I could have bought a clutch or those mini purse women bring during parties. But, I thought those would be impractical since I always bring everything with me (cell phones, digicam, tissue, etc). And this drawstring bag would match my dress which is rather kimono styled.
I took the original design from Sarah Bradberry (click link to see the tutorial) with alterations due to my inability to use the sewing machine. Seriously, I don't use those scary machines! It's all handmade.

What you need:
2 pieces of 29 x 30 cm cloth of your choice (cotton works best, IMHO)
neadle
thread
embroidery thread
scissor
pencil/cloth pencil
pins

Time Estimation:
1 week (this is because I was sooooo lazy. Believe me, you can finish it in 1 or 2 days).

So here are the steps.

1. Prepare the cloth

I used one piece of cloth that I folded into two. You can use two pieces but it's really up to you. I just couldn't be bothered to hand sew a lot. Don't forget to neaten the fraying cloth buy using zig zag or overcast stitch (machine) or blanket stitch (hand-sewn).
The measurement is 29x30cm (length x height) as seen in picture.

2. Prepare the Embroidery

Before you sew your cloth together, it's easier to embroider on it first. I free styled sakura on a piece of paper and traced it on the cloth using drawing pencil. It doesn't really wash off but it's okay since the pencil line will be covered by thread.

3. Final Embroidery Result

This is what the final result is. The big Sakura are embroidered with running stitch and french knot. While the smaller ones use satin stitch. If you have no idea about embroidery stitches, go check Google. I've never done this before and it turned out not bad. So I think you have the chance to be able to do it even though you've never done it before.

4. Sew Your Cloth Together

*sorry for using the first photo, I forgot to take a pic of this step*
After you've embroidered the cloth, now it's time to sew it together. The red line on the pic indicates where you need to sew. I didn't sew the bottom part because I only need to fold it. But if you use two pieces of clothes, you definitely gotta sew it.
If you hand sew, use back stitch. It's pretty strong.

5. Sew the Top! :D

Now that you've sewn the sides, fold the seams and iron it. Then you take the top and fold it around 5cm. The red lines on the picture indicates where you have to sew.
I used double running stitch to give the effect of having back stitch (because original back stitch would show the ugly side of the stitch and you wouldn't want that).
When you're done with one side, do it on the other side.

6. Put the String In

Now it's time to put the string in. Make sure you put it from opposite sides, so when you pull it the top of the bag will crunch together.
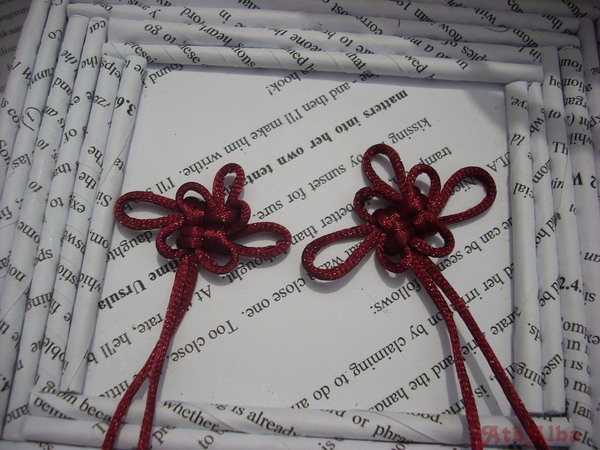
I don't know what string I used, but the measurement is 1 meter each and I made a decorative shamrock knot on each of the strings (it's also a charm knot for luck^^).

7. Voila!

This is the end result of the bag. Pretty neat, isn't it, for handmade? :D

*BONUS*

This is how the bag looks. It has everything in it, that's why it's rather bulgy. And no, the guy is not my boyfriend. :)

Monday, October 11, 2010

Oishii Sushi Platter


This is my sushi platter charm that I made using air dry clay. And as usual, I got the inspiration from Cut Out and Keep, Sumptuous Sushi Platter (taken from the book the Polymer Clay Cookbook).

I had to make adjustments because air dry clay has different texture than polymer clay. It dries by exposing to the air (no baking needed) and it has a rubbery texture when it dries. I have never tried using polymer clay, but I think it turns hard after being baked in the oven.

Here's my version of the the sushi platter. I added tamago sushi, cucumber roll, and ikura sushi because I thought it would be boring just to have nigiri sushi.

Itadakimasu, minna!


The sushi assortment, before being put on a platter


The sushi platter, haven't put a bail on it yet

Friday, October 8, 2010

My Photo Pop Art

I'm one you can call so inept in technology. I can do basic typing and things like that, but when it comes to advance technology - like photo editing via photoshop - you can be sure that I would be clueless.

That's why, when Cat Morley posted a how-to on turning your photo into pop art, I was quite ecstatic. The best resulting ones are the pouty or moody photos. Of all the photos that I have in my laptop hard disk, I only found one appropriate one. And well yeah, the result looks pop art enough for me.

I made two versions via photoscape. I like the brighter colour one. It looks more "pop".


Bright pop art. Pouty enough, isn't it?


This one was actually my first attempt. Not that bad, gloomy tho.

Wednesday, October 6, 2010

Felt Cake (with strawberry on top)


I made this project during my felt craft rage. It was inspired by one of the wedding gifts that my parents received.

Unfortunately, since I didn't like to follow the exact tutorial, I had to alter a square cake into a round cake. Square cake is easier, especially if you have to insert a box inside it.

But that didn't discourage me, and ta-da, you can see the result of my persistence!

So, if you're interested, here are the basic "ingredients":

felt (any colour that you want your cake to be)
thread and needle, or glue if you're feeling lazy to sew
a small box to put inside the felt.

My box was made out of extra manila paper that I had around which I wrapped with flowery scrap cloth. Recycling? Definitely. :D


Not that neat, but I'm quite satisfied with the result


I use it to store my extra charm loops. Oh, and one of my unused SIM card.

Saturday, October 2, 2010

Caged Heart


Basically I got this project from Cut Out and Keep (sorry if there's no credit, I'll try to find it later on), but there was no how-tos so I had to figure it out on my own. I have to say that this is way easier than math.

The heart is made from Amos Air Dry Clay because I couldn't find any teeny weeny heart charm. I was planning to put a yellow butterfly but then I realized that it was a yellow ribbon, not butterfly. Thank goodness for my procrastination! :p

Well, anyway, the photo above is the result. I think it looks pretty cool for someone being so lame in wire craft. Hehe.

Thursday, September 30, 2010

Me Wants Doraemon Kewl Devices!

Doraemon, a blue futuristic cat robot, is (I think) definitely one of the most famous Japanese character. It's cute, kind, and positively has the coolest gadgets in the world. When I was a kid, I definitely had to watch it every Sunday 9 a.m at one of the station TVs in my country.

The anime comes with a unique opening song. I remembered last year, when I had work camp, we sang Doraemon soundtrack in Japanese, Indonesian, Korean, and Spanish! There was a French, but he didn't really know the song.

This shows that Doraemon is such a famous anime. Especially the coolest gadget in the world, "Dokodemo Door", or everywhere door (I don't know the exact term, but dokodemo is translated roughly into everywhere). Who wouldn't want a door that could go anywhere? Definitely not me! I can go anywhere in this world without thinking about time and money. Haha.

I've listed some Doraemon gadgets that still stick into my mind till now. It's kinda random though.

1. Dokodemo Door
As I've explained, who wouldn't want this? :D

2. Hair Changing Device
This was used by Nobita to play prank on his friends. I would want this gadget to change my hair style everyday. Today curls, tomorrow dreads, the day after tomorrow pixie!

3. Smell-satisfying Hunger Device
This device was used by Nobita to ease is hunger. With this device, by just looking at a picture of a food, we can smell its fragrance and get full without having to eat. This device is definitely good for those on a diet. Hehe.

4. Duplicating Device
This was used by Nobita and Doraemon to duplicate things. Go to jewelry store, take pictures of cute necklace/ring/bracelet etc and duplicate them. Instant bling bling. :p

5. Languange Sponge
Last but not least, the language sponge is one of the gadgets next best to Dokodemo Door. It can translate many kinds of languages, including alien ones. Me definitli wantz thiz!

Of course, there are so many other Doraemon cool gadgets, but these five are the ones that are stuck in my head.

If you got preference other than these mentioned, do share. Because la la la, totemo daisuki... Doraemon - we all love Doraemon! :)

Wednesday, September 29, 2010

Paper Rose Bouquet (out of my final project papers)


I just finished my study and now I'm waiting for my graduation. Between the final test and the graduation day, I have no exact activities. Therefore, I made these paper roses out of my final project papers (I've got heaps of them).

If I sell my papers, I can't bear seeing someone eating food which is wrapped with paper with my name or my work on it. I heard this once happened to my friend.

And after all, this is recycling, isn't it? Save the trees everyone! :D

If you're interested in making these lovely (unscented) roses, just go here. But beware, it's rather addictive. Hehe.

Monday, September 27, 2010

Cage Pendant

Few months ago I had this obsession about wire, especially wire wrapping. It looked so easy, those wrapping stones, gems, and so on using craft wire. However, when I tried it the first time, it was a total mess. I gave up.

Then, last August I tried to give it another go. And tada! I finally did it! I tried to use a small sea shell, but it didn't work. So, I have to make do with this plain blue marble (and it doesn't even have a marble-y texture).

If you want to try to make one, here's the link to the site. It's not that hard to make, seriously. :)

I also posted this on my Cut Out and Keep account, AthAlba, just in case if you want to see the site.


My cage pendant. What do you think?

Monday, September 20, 2010

Craft: Medium Choice

I love crafting since I was a little girl. It gives me the satisfaction of making things, though sometimes I do not like doing it when under pressure (re: school craft).

There are many kinds of crafts that are done, from sewing, beading, knitting, crocheting, macrame, kneading, wiring, and so on.

From where I come from (Java, Indonesia), I think that the preferred craft here is beading. Beading is making things from beads. It's not necessarily jewelry. Those beads could be created into tissue box cover, bag, tiny purse, and more.

One of my aunties pointed out to me about how she likes bead creations and somehow I get the feeling that what I do is inferior. I like bead creations and I admit that they are tricky to make but those are truly not my things. Reasons why they are not: 1. I have to buy the beads. 2. However different the motif is, but the beads are quite common, sometimes even dull. Unless if these beads are not bought but hand made so they have different texture from one and another.

When I went to this craft-jewelry store, most people where learning how to make jewelry out of beads and wire. Okay, pretty, but then it all looks the same to me. Craft medium like clays and doughs somehow are associated with little kids.

Personally, I'm not a fan of every craft that I have to buy the medium firsthand. I do indulge my whim once in a while by buying wire, felt or clay. But normally I'd rather use what I have in hands. So basically, I like recycling.

The feeling of recycling is really fun. From one thing you can turn it into another. Who'd guest paper wrapper could turn into cute beaded bracelet? Or maybe carton turns out into tissue box? And, I think, it's also earth preservation.

But anyway, crafting is a choice. One cannot force whatever one likes to another. Difference makes this world colourful and unique! :)


These are beads that I bought (and given).


These are recycled things, flower brooch from cloth, bracelet from paper wrapper.

Keys to Success

When we do anything, including craft, especially craft, one key to the success is a lot and lot of patience.

The other key is skill.

So if you have both, you're bound to be successful in whatever you do. At least that's my theory.


*first attempt at making air dry clay craft with little patience and lack of skill

Sunday, September 19, 2010

Literature: To Each His Own

Walaupun judul post ini memakai bahasa Inggris, tapi kali ini isi post-nya kutulis pakai bahasa Indonesia. Sekali-kali deh, nulis pakai bahasa nasional. Itung-itung nglatih kemampuan berbahasa Indonesia EYD (ejaan yang diselewengkan). :p

Ini post tentang fiksimini yang ada di Twitter itu. Tentang cerita fiksi yang pendek-pendek gitu deh - kalo mo tau info lengkap, buka aja @fiksimini di twitter. Temen-temen Twitter-ku tuh pada ikutan fiksimini itu dan malah ada yang saingan skor retweet oleh admin fiksimini (yeah, you! you know who you are, guys!). Entah kenapa aku sama sekali ga berminat bikin fiksi yang pendek-pendek gitu, apalagi kalo isinya galau. Mungkin kalo yang wagu-wagu aku masih bisa kali ya? Ga tau deh.

Nah, gara-gara fiksimini ini, aku jadi teringat waktu semester 2 di kelas "Introduction to Literature". Itu pengenalan terhadap kesastraan gitu deh. Dosenku waktu itu cerita tentang kedua anaknya, kembar cowok cewek yang punya kebiasaan bedaaaaa banget. Tak luput juga dalam hal sastra.

Jadi, ceritanya mereka disuruh bikin tugas mengarang dengan tema yang kalo ga salah tentang "bangun di malam hari untuk pipis". Anak cewek ibu dosen itu menulis berhalaman panjangnya tentang apa yang akan dia lakukan kalo bangun di malam hari. Mulai dari kalo ketemu hantulah, dan gini gitu (imajinasi kuat anak SD).

Sementara kembarannya yang cowok hanya menulis, yang kalo ga salah (inti) bunyinya, "Saya akan bangun. Lalu pipis di dalam botol. Lalu saya akan menutup botol dan kembali tidur lagi." - kata-kata disesuaikan dengan ingatan penulis.

Kontan aja sekelas langsung ketawa habis denger cerita dari dosen saya itu. Lalu dosen saya pun menerangkan bahwa tiap orang punya cara sendiri-sendiri dalam mengekspresikan jiwa seni mereka.

Coba aja tu kalo itu orang lain yang ga ngerti sastra dan terpaku pada ajaran "general", pasti nganggep kalo bikin cerita itu harus panjang lebar dan indah. Cape dehhhh....

Dan, akhir kata, sebagai bonus, kukasih fiksimini dariku nih. Selamat menikmati. *huweeek*

DARAH bercucuran deras di mukanya. Jerawatnya baru saja pecah.

XP

Tuesday, September 7, 2010

Why do we read?

While I was searching for the materials for my final project, I found this interesting article about why we read.

Personally for me, it depends on the text itself. If the texts are in novels or comics (comedy is preferable), I read it either for pleasure or because I'm bored. But if the texts are in science book or something like that, the answer definitely is because I HAVE to read it. It's just unavoidable.

So, the question is, why do you read?